# Sample Analysis

The Sample Analysis dashlet, which [could be added](https://docs.tensorleap.ai/user-interface/project/dashboards/..#adding-dashlets) via the dashboards tab, allows a per-sample analysis using a gradcam like analysis. It returns the input, overlayed with an attention-like heatmap of the features that effects the model decision for a specific label, per model layer.

This allows to not only understand what effects the model's final decision, but also how does this decompose into more granular features on earlier layers. This is&#x20;

## Sample Analysis

Analysis of a sample returns results from a variety of explainability and error-analysis algorithms, in addition to all its visualizations defined by the [**Visualizers**](https://docs.tensorleap.ai/user-interface/project/network/network-mapping/create-a-mapping-deprecated/visualizer-node).

### Running Sample Analysis

#### Running Sample Analysis from Population Exploration

<figure><img src="https://3509361326-files.gitbook.io/~/files/v0/b/gitbook-x-prod.appspot.com/o/spaces%2F9UXeOlFqlw8pl79U2HGU%2Fuploads%2FeIvQRJumaq8G7YN3VPlp%2FKapture%202025-07-06%20at%2019.36.20.gif?alt=media&#x26;token=a1a82d7d-66b6-4d24-a37d-822c0b96651f" alt=""><figcaption><p>
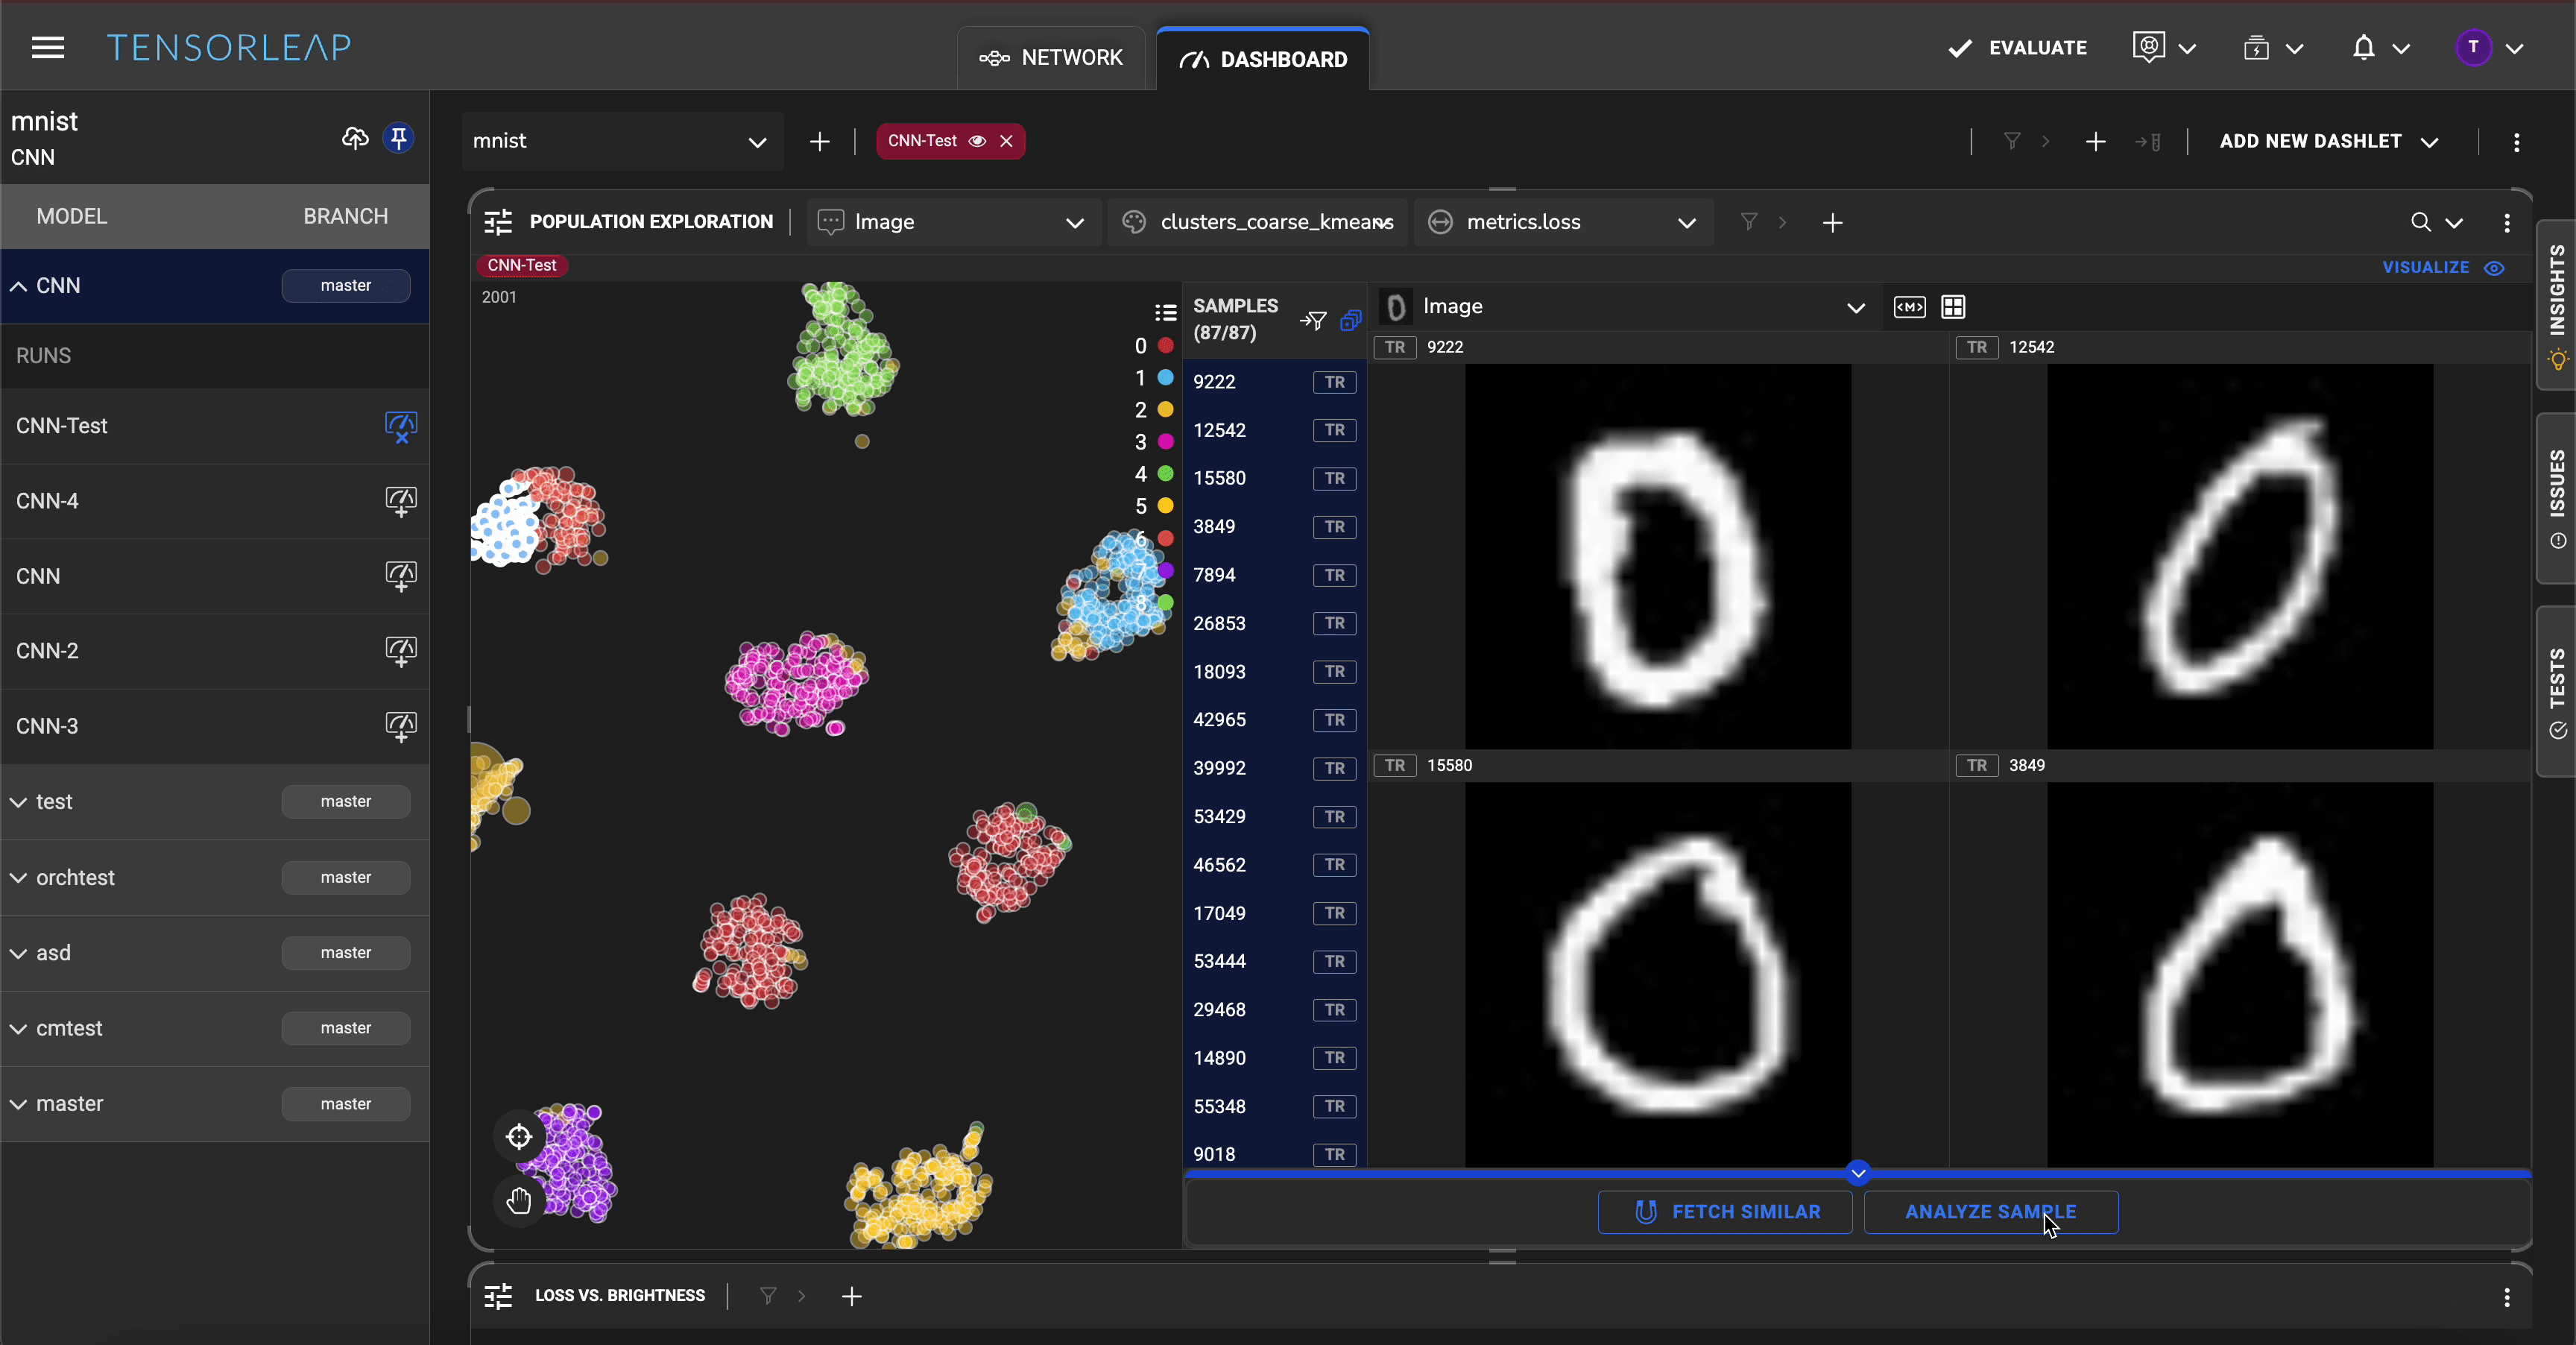
Running Sample analysis from population exploration</p></figcaption></figure>

1. Click a dot within the [**Population Exploration**](https://docs.tensorleap.ai/user-interface/project/dashboards/dashlets/population-exploration) view and selecting a sample.
2. Click "Analyze Sample" on the lower bar.
3. Select sample ID and algorithm
4. Hit "Analyze Sample" again

{% hint style="info" %}
We offer 3 algorithms to compute the heatmaps:

* GradCam
* LayerCam
* Focus Layer Cam - which is our own variation of LayerCam.
  {% endhint %}

#### Running an analysis from the sample analysis dashlet

<figure><img src="https://3509361326-files.gitbook.io/~/files/v0/b/gitbook-x-prod.appspot.com/o/spaces%2F9UXeOlFqlw8pl79U2HGU%2Fuploads%2Fh2HSV31eV2DF2bu9dGiJ%2FKapture%202025-07-07%20at%2000.03.28.gif?alt=media&#x26;token=4432a04e-4198-400c-9ad7-7ca976197f55" alt=""><figcaption></figcaption></figure>

1. [Adding](https://docs.tensorleap.ai/user-interface/project/dashboards/..#adding-dashlets) the Sample Analysis dashlet.
2. Make sure that a target model run is [selected](https://docs.tensorleap.ai/user-interface/project/dashboards/..#adding-and-removing-a-model-from-analysis).
3. Select Data Slice, sample ID, and algorithm.
4. Click "Analyze".

After the analysis is complete, you can further explore the model's response to the sample. The list of [**Visualizers**](https://docs.tensorleap.ai/user-interface/project/network/network-mapping/create-a-mapping-deprecated/visualizer-node) and their outputs can be found on the left, and the error-analysis visualizations can be found on the right.

### The Sample Analysis Dashlet

<figure><img src="https://3509361326-files.gitbook.io/~/files/v0/b/gitbook-x-prod.appspot.com/o/spaces%2F9UXeOlFqlw8pl79U2HGU%2Fuploads%2FZ8maPlnKUcZOIS1SWmIN%2Fimage.png?alt=media&#x26;token=40172fe4-684e-4a7e-bfb8-d0246760edc0" alt=""><figcaption><p>
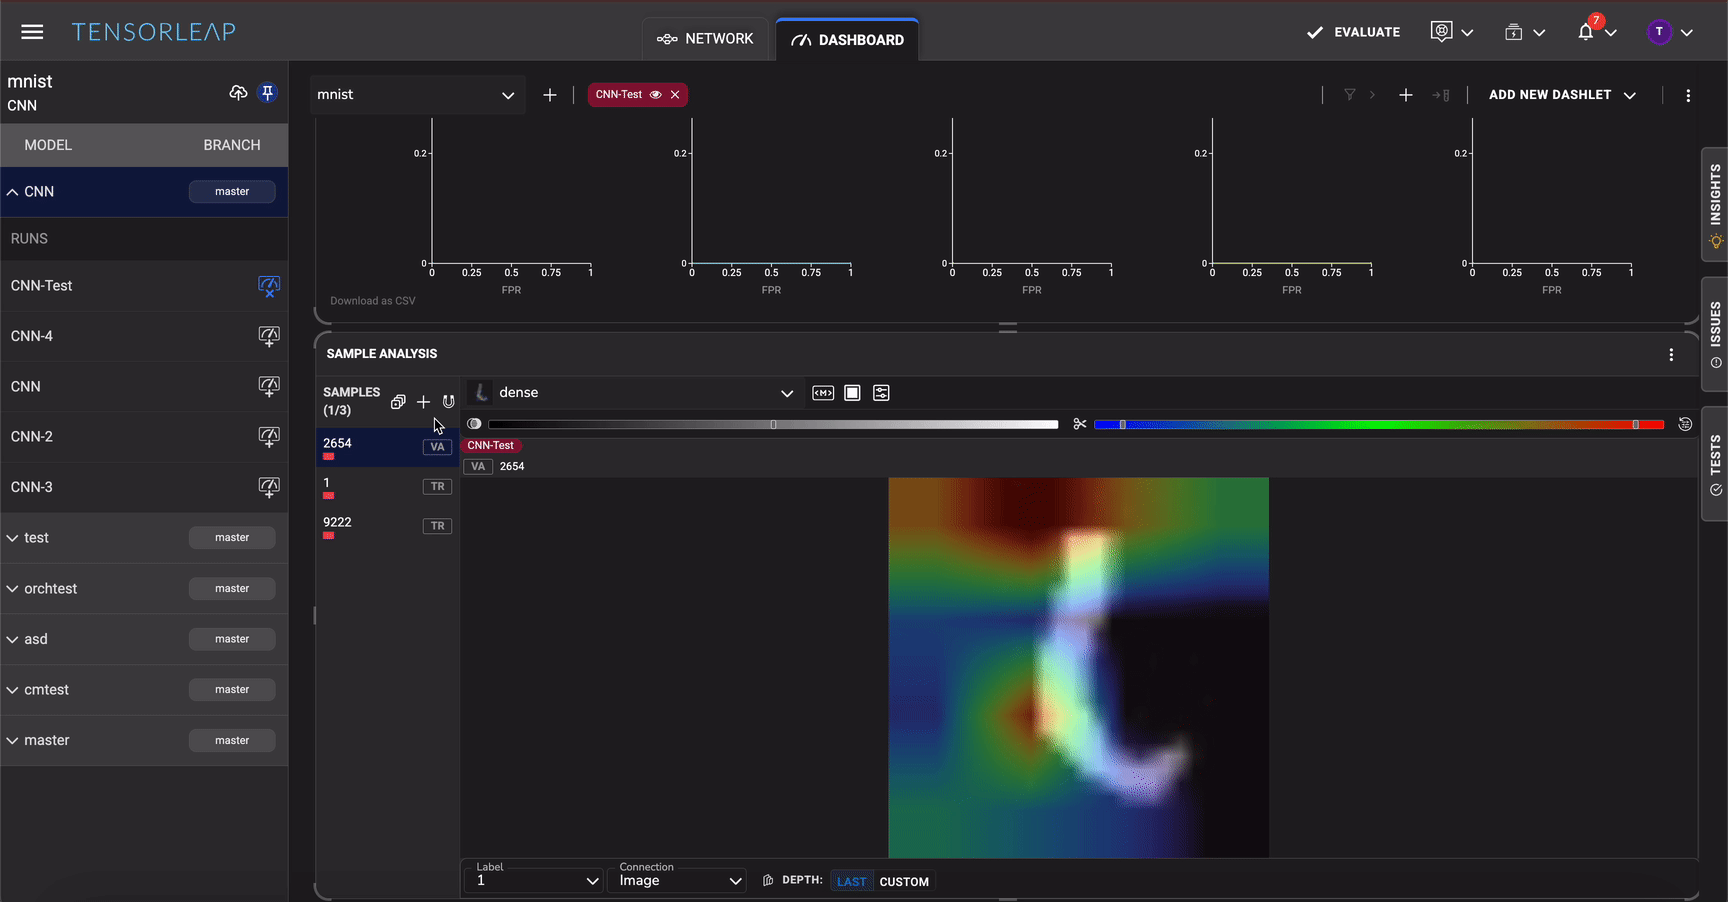
The Sample Analysis dashlet with its three sections: (1) sample list (2) sample viewer (3) layer and label selection</p></figcaption></figure>

The sample selection is composed of 3 distinct sections:

1. The sample selection panel that show which sample are selected and allow to take the following actions using the its top buttons:
   1. Select All samples
   2. Add another sample to analysis
   3. [Fetch similar samples](https://docs.tensorleap.ai/user-interface/project/dashboards/dashboard-actions/fetch-similar)
2. The viewer tab is similar to the [sample visualization](https://docs.tensorleap.ai/user-interface/project/dashboards/population-exploration#the-sample-review-panel) in population exploration. The default visualizer that is chosen is the grad-cam-like visualizer (i.e. input with attention heatmap overlayed). All other visualizers are available as well
3. The controller panel where it is possible to select:
   1. **Label**: the grad-cam like is computed with respect to
   2. **Connection**: i.e. on which input is the heatmap overlayed
   3. **Depth**: The layer on which the grad-cam-like heatmap is computed. By default the last layer is selected. Moving the selection to custom and moving the controller to the left shows the gradcam-like heatmap on earlier. The depth is computed by the amount of layers between the respective input and the layer.

<figure><img src="https://3509361326-files.gitbook.io/~/files/v0/b/gitbook-x-prod.appspot.com/o/spaces%2F9UXeOlFqlw8pl79U2HGU%2Fuploads%2FCckpbo3ujbgNTjE3IMau%2FKapture%202025-07-07%20at%2000.22.35.gif?alt=media&#x26;token=34cbfedd-5a3f-438f-ad0c-26ed70d318c7" alt=""><figcaption><p>
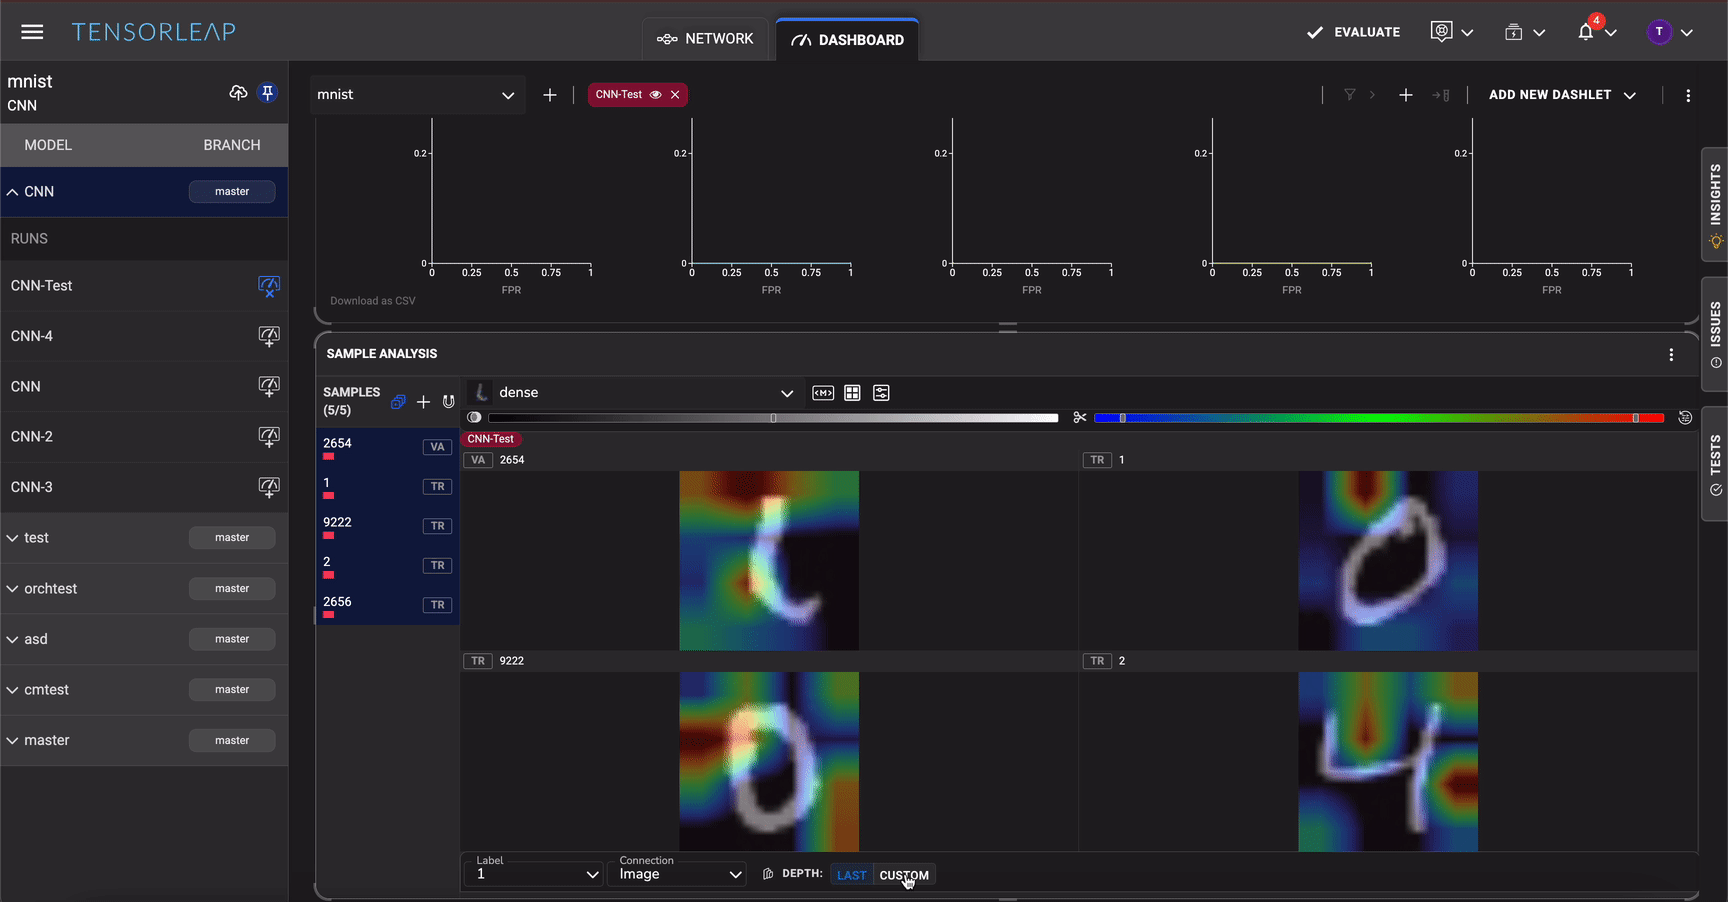
Showing the gradcam-like heatmaps on the different layers of the model.</p></figcaption></figure>
